Saturday, July 30, 2011

School Days , School Days (Unschool Days)

Making a Cake
I have recently seen many blogs and posts about going back to school or homeschooling. I myself Unschool my 9 yr. old and it has worked wonders for us. Some people think that by unschooling I just let her do whatever she wants and pay little to no attention to her. They also question how she can actually learn anything useful like Math , Science and English / Language Arts without a curriculum . The first thing I tell people is that everything she does is learning , when she makes a batch of muffins or cookies she is in fact doing math , science and language arts. "Not really they reply" , it's not the same as what she would learn in school or with a curriculum. No , I reply she learns much more. She is learning to be an independent thinker , she is learning at her own pace and in her own way. She doesn't feel threatened or pressured to preform like a monkey on cue. She isn't drilled 8 hrs. a day to pass a test to gain money for an institution that has failed her as well as her father. After this they tend to walk away , turn their chairs so their backs face me or simply tell me I am not doing right by my child. I have run into this all the time and more then many of my fellow unschoolers. It's not to say on occasion that some parents actually are interested and have valid questions which I am all to happy to answer. I mean I have to admit I too am learning what works best for us. We have only been unschooling for 1 school yr. , I say school year so those who don't unschool can relate to a time frame. But I can tell you it has been a blessing for us. She attends unschooling yr. round , everything she does is considered learning and she has the freedom to express herself.


Pottery
 We are also able to opt. out of certain vaccines , you see it is up to me what shots  she gets and which ones she doesn't. And that is how it should be in my mind , no-one but I should be saying what can and can't be pumped into my child. This is not for everyone and I am not pushing it or saying that public school doesn't have it's place or that home schooling with a curriculum doesn't work. What I am saying is that it doesn't work for us. Public school in my thinking after raising 3 grown men Doesn't Work , this is my own opinion. It didn't work for my 2 older children and my youngest did what the rest of the programmed children do , he memorized everything and would pass the test given him and move on to the next test. He doesn't think for himself and has challenged me many times in regards to my decision to continue unschooling because he thinks I need time away from her , I need a daily break. He has told me I am not doing things right since his teachers told him the only way to do something is the way they taught him , so let's see he learned to NOT think for himself. I am very Pro Home schooling and Unschooling at least with home schooling YOU get to choose what they will learn , how they will learn it and at their own pace much like unschooling. The only real difference between unschooling and home schooling is the curriculum and many times you will find home schooler's and unschooler's socializing together online or in public , at events and so on. This is due to the fact we understand each other and the freedom we desire as well as respect each other.
Sewing Class
Preparing Green Beans


Some may think that the conversation above is me being rude and not giving someone a chance. It isn't I can tell when someone is being judgmental or if they are sincere in asking me. And I am over having to explain myself to those with an attitude or dare to tell me I am not doing right by my child. I am over the Government telling me how to raise my child , what to feed my child , what she needs to know , how to teach it , why to teach it , when to go to the potty , when to eat , sleep and play.
Writing with Quill on P.J. Day
I do love the deals that come with the beginning of a public school yr. The crayons , paints , colored pencils , paper and more. Just because we unschool doesn't mean she doesn't need supplies as well. Plus it gives me a chance to stock up. We do many things as unschoolers like many field trips , crafts are a huge part of our daily lives , cooking is a must since we need to eat and eat healthy , shopping for our food , cleaning our rooms and home , watering and caring for our plants. These are only a few learning things we do , you see they all have elements of academics that public school teaches. Shopping for our food is math / money management and reading / language arts , Field trips are hands on learning which could be History or Science,  Crafts again Language arts since reading directions is a must and freedom of expression something Public schools DO NOT LIKE. Cooking teaches language arts / reading , science / what happens as food cooks and the chemical reactions that occur when cooking , math / fractions and multiplying if you double your recipe perhaps and Health is also covered which Public schools don't teach anymore outside of Sex. Watering and caring for plants cover Agriculture many children never learn this in Public school.
ST Augustine Field Trip
So we eat when we are hungry , we sleep when we are tired , we learn at our own pace and learn what we are interested in. We don't take tests , we do receive praise and get plenty of one on one attention and we live our lives as we see fit. We wear what we want and express ourselves freely. We don't strive to live up to anyone else's expectations but our own.


So I say HAPPY UNSCHOOL YEAR!!!!!!!!

Thursday, July 28, 2011

Paper Cakes and Flights of Fancy

Dreams of Cake and Flights of Fancy make wishes possible. These Paper Cakes slices are perfect for any occasion from children's parties to wedding showers and everything in between. This is a No Calorie Cake so Adults Will Really Enjoy this Recipe :)  This is so popular with kids of all Ages you can't loose. This template comes from one of my favorite websites Mirkwood Designs / Templates
and they are all Free!!! We Love Free!!! Here's the actual cake template Paper Cake Template , you can enlarge this by simply clicking on the template and then print. I haven't printed one in a while but the last time I did it printed the zoomed size , if not you can always enlarge it yourself. Print as many as you think you will need and different sizes as well if you would like to make a layered cake. Get creative and be sure to Have some fun!!! Fill with prizes and treats themed to your party. ( I did not include step by step instructions for this since it is so simple. It requires folding along the lines nothing more. )


PAPER CAKE RECIPE

Ingredients : Dreams , Love , Imagination , Template , Thick Colorful Paper to Print on ,  Tape , Glue  , Glitter , Pom-Pom's , Lace , Bow's and everything in between. Filling is made of Pure Love and Flights of Fancy :)

Summer and the Ice Monster

This is dedicated to everyone that has ever went to the freezer to get some ice for your drink only to find that all the ice is gone and no-one has bothered to replace , refill or do anything to replenish the Ice , this creatures name is The Ice Monster. And every family has at least one living in their home. 
I was thinking about this while I was filling a used milk carton with water , which we use for ice for our ice cream maker. There was a time that my family and I made ice just like this but for our drinks. We would freeze water in anything we could clean out and fill with a decent amount of water. Once frozen we would get out the ice pick , anyone remember those???? lol  And chop , chop , chop until we had filled a large bowl or clean bucket with ice. We never had to worry about keeping anything cold we always had ice. 
So I was wondering why we as a society now don't do this anymore. Is it due to the fact it is to dangerous? I think not I was chopping ice when I was 8 and I am still alive all fingers are present and counted for. Perhaps it is the quality of water? That is a good point but we can always get a filter for the tap. Maybe and please don't get offended , but maybe it is due to the fact we are just to lazy. I am guilty of this myself. It is so easy just to buy a bag of ice and go out and get what I want already to go. 
It is inexpensive as well so why not? Well if your spending let's say 2 dollars a big on ice and you buy even one bag a week that adds up to 96 dollars a year! Maybe to some that doesn't sound like much but to me it's Huge! And if you double that to 2 bags a week your up to 192 dollars a year , now do I have you attention?
Anything that holds liquid and can be washed out well , sometimes cutting the top off helps. Milk Jugs or Cartons , Juice Jugs and Cartons are perfect if you have some large old storage containers those work as well. Now here's the hard part , finding an ice pick. At least for me it has been an issue , believe it or not most stores no longer sell them. I suppose they are to easily used as a weapon so don't sell them people will be stabbing each other all over the place : P 
Not only are you going to save money , always have ice but you will be recycling as well. Just by cleaning out you containers and using them to freeze water. Many can be reused a few times before having to send them to the recycle bin. 
Yogurt containers are great for the little ones to make fruit cycles or frozen yogurt pops. There are so many things we could be using in our day to day lives to keep us cool during these Summer Days of Heat. Try and become creative and see what you can use. Be sure to involve your family , that's the greatest reward of living a Simpler Life.
Once the ice is frozen well let it thaw a bit before attempting to chop it up. It juts makes things easier and sometimes your able to get it out of the container before chopping and this way you can reuse the container again : ) 

Wednesday, July 27, 2011

Rainy Day Treat

Rain , Rain come and play , Come and play with us today. Relax our minds and fill our souls. As you did in the days of old. ( this is a little poem we made up when we are in need of rain )
The weather has been something to be discussed by all , all over the country people are dealing with temps. above and beyond. It is no different here in Florida. Today however we are going to be blessed with rain. Yes , Life giving Rain!!! Who doesn't love some good old comfort food on a rainy day? For my family and I we love days like these , it is so relaxing and the fact that it cleans the air and cools off the temps. But the best thing is the fact that we enjoy warm comfort foods which not only fill our body's but our hearts and souls as well. If you think back to a younger you I am sure you will think of something that moves you on a rainy day. Maybe you to could try to create that feeling of fullness for your mind and body when the rains bless you with a visit by making a simple and memorable comfort food.
I have plenty of cherries left over from my jam making and thought what would be nice to make for my family? What better then a Cherry Crumble?  Since we are having roasted  chicken , mashed potatoes and some of my canned green beans this sounded like the perfect dessert. Most people would make this just before serving but I am realistic in the fact that once I am finished eating and cleaning up I don't want to have to go back into the kitchen to make dessert. So I make mine 2 - 3 hours before dinner , I also use a glass baking dish and place it on a wood cutting board this helps to keep it warm as well. There are many different recipes out there some use oatmeal in the topping but the over all concepts are all the same. Simple , healthy and inexpensive ingredients. Keep in mind that this is something to make when the fruit is in season and if not go to your pantry and pull out your jams that you canned earlier in the year. 

For cherry mixture
4 cups pitted, fresh cherries
4 tbsp sugar (this will produce a mildly sweet crumble. add more sugar if you like)
8 tbsp water
1 tsp corn starch
For crumb topping ( my family and I like extra topping so you may want to cut this in half for a lighter topping )
1 1/2 cup flour
6 tbsp brown sugar
4 tbsp white sugar
a pinch of ground cinnamon
a pinch of salt
2/3 cup unsalted butter, melted plus more to butter baking dish
Preheat oven to 400 f
Pit Cherries. 

Place the pitted cherries and sugar in a saucepan. Cook on medium-high heat for about 4 minutes or untill the cherries are lightly softened. Mix in corn starch and water. Cook for about 1 minute or till the mixture thickens.

To make the streusel or crumb topping, combine the flour, brown and white sugars, cinnamon and salt together. 

Mix well. Then pour in the cooled melted butter. Using your fingers, rub the butter into the flour until it forms a crumbly mixture.

Lightly butter or non stick spray an 8 x 8 baking dish . 


Place the crumb topping on top and bake for 15 minutes or till the topping has lightly browned. 


Serve warm with ice cream  :)

Tuesday, July 26, 2011

Do-It-Yourself Butter

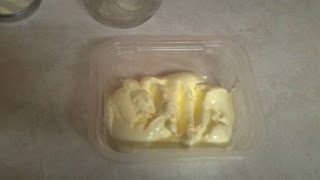
Who would think of making your own butter these days , with all the bad things butter does to us why would anyone want to even eat butter. The fact is Real butter in moderation is not unhealthy. Since it is dairy you do in fact get some benefits , I am not saying eat a stick of butter a day but I mean really? If you think about all the chemicals , hormones and other things in the store bought butter you might actually decide to make your own as well. It is awesome exercise and you won't have to buy a Shake Weight this does the same thing and you get a reward in the end....lol I know you can buy Organic butter but it is satisfying to know you can make it yourself and it's fun. My Middle son was over today and he helped with the process and let me tell you we all laughed so much. We even used bouncing the jar up and down on the bed , it was sight to see let me tell you :) And it is so simple you could incorporate it into any event you would like , the more the merrier and it can be an educational time as well. You can tell your children about the Pioneer's and Settler's and how they made their own butter as well as much more. Think how proud your child will be knowing they made something they can actually eat and share with family and friends. It is also handy if you happen to be baking and have no real butter in the house but happen to have heavy cream , you can add salt if you like but most recipes when baking call for unsalted. I'm not going to tell you it is cheaper to make your own vs. buying it in your local grocery , just healthier and fun. Please let me know how you liked it and your experience with it. I really think this is one of the most fun , self sufficient projects I have posted that anyone can do.

Homemade Butter : 


Ingredients : Heavy Cream , (Salt optional) , A sense of Humor and Lot's of Love


You will need a a jar large enough to hold the amount of cream you wish to turn into butter with a secure lid. I prefer to make smaller amounts of butter at a time since the more cream you use the longer it will take to make the butter. 


 Typically half a Pint to  3/4 a pint is plenty. Pour your cream into the jar add  a pinch of salt if desired and seal the lid securely and begin to shake vigorously  in an up and down motion for aprox. 10 minutes (smaller amounts may require a smaller amount of time). 


During this time you will see the butter start to form , then it will start to separate you will see a milky liquid appear again don't stop shaking be sure to shake for the full 10 minutes. After the 10 minutes look at your butter and if firm pour off any excess liquid. Store in a air tight container.


Some people like to rinse the butter off with cold water , I have never had to do this. You may after placing in the fridge notice a little milk develop if so simply pour off the excess and use as normal. 


That's it you have made your own butter :) I Hope it was as much fun for you and your family as it was for mine.


Monday, July 25, 2011

Milk / Let's Save The Earth ( Featured Website )

You would think that something as simple as milk would not contain over 20 different painkillers  , antibiotics and growth hormones. You would be wrong. A recent study has proven this to be true. My friend's at Let's Save the Earth have decided to take a stand on this issue which affects each and everyone of us and our families. I encourage you to go check out their website by clicking their name highlighted above to learn more and join the website. I will be participating in this and have taken their advice and purchased some Smart Balance they recommended and to tell you the truth we loved it! It is time to Save the Earth and all living creatures on it. By taking simple & small steps we can change our world , our health and our thinking. In this way we can learn to Live A Simple Life.

Cherry Jam

Childhood memories are filled with all kinds of scents and flavors , some from holidays of our youth while others remind us of the coming of summer. We can all think of a scent or food that simply takes us back in time. For my husband this jam is all of those things. You see my husband could not be more thrilled with my canning efforts and the fact that Cherries are his favorite doesn't hurt. Many people want to know why Jam's? Well it's simple ( A Simpler Life ) , jams are sweet much like candy and living in Florida Canning makes the most sense since we face hurricanes every year , not to mention the thunderstorms which can take out our power or produce tornadoes. So as easy as it is to freeze it really makes no sense considering where I live. The other reason , it is healthier then most store bought. I can use as much or as little sugar as I want in most recipes. And last but not least I save money. I can have the fruits I love year round without having to spend a fortune on them. I buy them when in season , can them and eat all year round on our Homemade Ice Cream , toast , Sandwiches and so much more. Most canned jams and jellies will last a year or more. The more is when you start to loose some of the nutritional value , they are still good to eat but loose some of their dietary value as time goes on. Many people use cherry pitters which I am sure makes it a little easier , but I prefer the old fashioned way of simply sitting and halving them to get the pits out. It's a good time to bond with family. So now you know my reasoning for canning so much. Below is the recipe I am currently using which came from Cooks.com but I have seen others where spices such as cinnamon are added. And I am thinking of trying that myself since we love cinnamon. If you have a recipe you would like to share please let me know I am always looking for new recipes to try my only requirement is that it is as all natural as possible. I really enjoy the old recipes from our grand parents or older. They really knew how to cook :)

** I did alter the recipe a bit before posting since after making it I found that simmering the cherries for a few minutes helped. I used halved cherries not chopped and the sugar did not dissolve as quickly as they said so I added another minute to the boil time. Also I did not get any foam so skimming was not an issue. It tastes great and I am planning on using a jar of it for cherry cobbler. That is how versatile canned jams are.**


CHERRY JAM

4 c. pitted, chopped sweet or sour cherries
1 pkg. powdered pectin
1/4 c. lemon juice (use only with sweet cherries)
5 c. sugar

Combine cherries, pectin and lemon juice (if needed) in a large sauce pot. Bring to Boil and Simmer over med. high heat for about 3-5 mins. Add sugar. Bring to a full rolling boil; boil for 1-2 minutes, stirring constantly. If Foam develops Skim foam. Pour, hot into hot jars, leaving 1/4 inch head space. Adjust caps. Process 10 minutes in boiling water bath. Makes about 6 or 7 half pints.

Saturday, July 23, 2011

Strawberry Jam

Here is the recipe I use to make my homemade jam. Strawberries are at a great price right now so now is the time to buy them up and get cooking. I found this recipe at http://www.ci.tumwater.wa.us/researchcraftsandgames.htm there are other fun things there as well. This recipe does work but please be sure to follow the instructions fully. This is called water bath canning. Instead of a pressure canner you simply boil the jars and let cool. They should seal while they cool , you can check this by pushing on the center of the lid. If it doesn't go down you know it sealed. If it pushes down you can remove the lid clean the jar rim and lid. Replace the lid and reboil or you can simply keep in your frig. ( Other Berries can be used )
Buying fruits and veggies while in season saves money. Simple canning such as this will allow you to enjoy them when they are no longer in season. My little girl loves toast with the jams for dessert sometimes. Let me know how it went for you and if you enjoyed this recipe.

Strawberry Jam :

You’ll need:
  • 4 cups freshly picked blackberries, strawberries,
    or other berries
  • 3 cups sugar
  • 2 large apples, peeled, cored, and grated
  • 4 1-pint mason jars with new, unused lids and rings
  • a large cooking pot
  • a medium sauce pan
  • a small sauce pan
  • metal tongs
  1.      Pick over the berries and discard any that are rotten.  Blackberries and raspberries are very fragile, so unless they are very dirty or you know they have been sprayed with pesticides, it’s best not to wash them.
  2.      Combine the berries, sugar, and apples in a medium saucepan.  If you are using strawberries, you may want to slice them first.  Cook the jam over medium heat until the mixture begins to bubble.  Turn the heat down to medium-low and let it simmer. The jam will need to cook for a long time, about an hour.  To test if they are cooked enough, place a small spoonful of jam on a clean plate and let it cool.  When the cooled mixture holds together and can be spread, it is ready to can.
  3.      While the jam is cooking, wash the jars and lids in warm, soapy water.   Place the jars in the large cooking pot and fill it with water to the top.  Place the lids and rings in the small saucepan and cover with water.  Boil both the jars and lids for ten minutes.  It is important to sterilize the jars in boiling water so that bacteria don’t grow in the jars, ruining all your hard work. After you have boiled the jars and lids for ten minutes, turn the heat off and leave the jars in the hot water.
  4.      When the jam has thickened and the jars are sterilized, you are ready to pack the jam.  Carefully use the tongs to remove one jar from the hot water.  Fill the jar with hot jam, leaving ½ inch of space at the top.  Wipe off the edge of the jar with a damp cloth and place a lid on top. Tighten a ring around the jar.  Repeat with the other three jars.
  5.      Place the filled jars in the large cooking pot and cover them with water.  Turn the heat on high and boil the jars again for ten minutes.  This is very important!
  6.   Using the tongs, carefully remove the jars from the hot water and let them cool.  Label your jars with the kind of jam you’ve made and the date.  Homemade jam makes great gifts.  If you don’t eat it all right away, your unopened jam will keep for several years.

Friday, July 22, 2011

Simple Clothing

Any mom will tell you it can be difficult keeping up with the style demands of the family. The cost alone is enough to send us into shock. But when I decided to live a simpler life it only made sense to make our own clothing. Many would say well now the issue is finding patterns that are fashion forward so no one complains about how they are dressed. And it could be an issue except that I tend to modify patterns to fill those needs of style and society. And it may seem odd but my 9 yr. old is unschooled , the 22 yr. old is grown and has a job so he can buy what he wants and my husband has never been picky about much of anything. So it works for us , it is very rewarding making our own clothing , knowing that they are made just for them gives them a sense of how special each one of them are. I was thinking though how we as a society place so much value on how we dress and how much we spend in order to dress as well as worrying about if it is "IN" as it were. You see it is my opinion that way to much money is paid out for clothing , not just to purchase clothes but the fact that if it is no longer in style many throw them out , turn around and purchase the new wave of fashion set down for them simply because someone , somewhere said it had to be that way or else you won't fit in. There's a problem in that alone the fact that everyone is so worried about fitting in , instead of being an individual. What ever happened to free thinkers? And why do we feel the need to fit in so badly we are willing to spend and spend to the point of debt in order to achieve it? Not only am I making our clothing from scratch but I recycle most of it for one thing or another. Old towels for example are turned into rags for cleaning , they can be washed with the laundry and reused until they simply fall apart. I have made purses out of old jeans and quilts out of a number of old clothing , we also save the buttons off of everything.
But it is nice to have something new now and then and when I buy fabric for clothing I buy from the reduced fabrics or simple muslin works and since I can dye it any color we want it works well. By making it myself it is treasured more and they take better care of their clothing which makes them last longer as well. It is a win / win for everyone. The picture with this post is one of my husbands shirts I just finished. Even with the long sleeves it is cool and comfortable for him to wear year round. He enjoys period clothing as do I and we incorporate this with current clothing we already own. Now Please don't think I am a hypocrite , we do buy jeans due to the fact I hate making them as well as bathing suits. But we don't spend a months salary on one pair either. We shop thrift stores as often as we can which helps as well , when unable to find what we need then we go to a local department store and look for the best deals on brands we know will last. As with anything in our lives living a simpler life means taking it one step at a time. Little things make the difference , they get us thinking of ways to improve our lives and the world around us. And the impact that these things have on our families are priceless. My 9 yr. old is now sewing clothing for her dolls and we have started making rag dolls as well.  It gives us time together and she is learning while having fun. In the end she will be able to be self sufficient and won't need to depend on the Industry to live. Like those of let's say the 19th century she will need to make purchases but she won't need to spend her life working for someone else in order to survive.
Sewing is one of many ways to live a simpler life and provide for your family. It is becoming a lost art which to me is a real shame. Are we so lazy as a society that we can't make the time to live freely? To go back to a simpler way of living? I wonder at times what kind of example we are setting for our children. I have heard how both parents HAVE to work. I argue this word HAVE because the main reason both HAVE to work is because parents think they HAVE to keep up with their neighbors , they have to HAVE MORE. And they feel this way because they have been told to WANT More and more...... I myself found that my husband and I were falling into this trap. Our grown children one in particular has really fallen into it and I have only myself to blame. But I do have a choice to make a difference , my little girl who is only 9 can learn differently and the grown children can relearn as well. At holidays they will get one store bought item but something they need more then want the rest of their presents will be homemade. In this way over time they will learn the real meaning of want and need and how important family and the earth really are.
If you used to sew as a child , your not working now , want something to bring you closer to your family then I recommend getting your sewing gear out or learning how. It's not as hard as most think , it's much like putting a puzzle together and will save you money as well. One of the most popular department stores now has beginner patterns for 97 cents. Still unsure? Shop around , talk to your parents , grandparents and any other older family members. You'll be surprised at the info. you get not only about sewing but how they lived and survived. Which in the end may get you desiring a simpler life as well :)

Thursday, July 14, 2011

Canning Green Beans

Yesterday we canned some green beans and I was torn to some degree. I had done a ton of research regarding green beans and the whole canning process. It was over-whelming to say the least. You see when my great grandmother or aunt would can them they would cook them just as if we were going to eat them once done. And we did eat a portion of them but the rest were canned , now the issue was that they put bacon in their green beans and the research and advice I was reading was to Not add bacon or if I did to cook the bacon first then add it to the blanched green beans. You see most recipes call for cooking them only for 5 mins. or to can them raw. But I know for a fact since my canner which is a PRESSURE CANNER came with a booklet as to what we could can , how long and the use of the canner , that meat can be canned and that includes pork. The main issue people were having was the fact many people who can don't process the meats long enough and botulism would set up in their food. Trust me when I say Botulism scares me to death , no pun intended. But I grew up eating them this way and half of the research I had done said it would be fine as long as I processed it for the proper time. I went back checked my booklet and proceeded to can my green beans. I cooked them just as my great grandmother had done and placed them in the canner. With the help of my booklet I processed for 75 mins now keep in mind processing time is KEY when canning meat. The time is based on the size of your jar. Well of course I messed up , I did the 75 minutes but with my nerves being out of whack out of fear I did in fact make a mistake. I should have processed for 90 mins. since I had canned Quarts not pints. I don't like wasting anything and I really don't like wasting food or time. But I want to be very clear on this it is not worth the lives of my family so I did in fact throw them out! Never ever take the chance , if for any reason you are unsure DON'T EAT IT!!! I would much rather take the loss of money and food then the loss of one of my children or husband. Now I will be remaking another batch this weekend and I will insure that I process the proper amount of time for the size jar I am using. Mistakes are what we learn from and so I am proud to share this story with you all. I would hate for anyone to make the same mistake or worse actually eat under processed food from a simple canning mistake. I still plan on canning as much as possible to insure I know what is in my family's food. To many foods have to many additives that I simple don't want my family eating let alone the fact it is over processed. And it is a simpler way of living that actually brings us closer as a family. My little girl helps with the snapping of the beans which allows us to sit and talk about anything she has on her mind. It is also relaxing to simply sit and snap beans :) So it is a stress reliever as well , that's if your not stressing as I was over the processing time..lol Of course live and learn is my motto. We are also in the process of building a compost pile which is good for the Earth. We live in Florida and the soil is very poor here so with the compost we plan on enriching our soil and growing our own veggies. You see it is a cycle in an effort to live a simpler life I am actually able to give back not only to my family but to the Earth as well.
The recipe for my great grandmother's canned green beans is listed below.

Great Grandma's Canned Green Beans :


3 - 3 1/2 lbs. fresh green beans
Sea Salt
Pepper
Garlic Powder
1 Large Onion
3 to 4 Quart Jars


Snap off ends of the green beans and snap in half to about 1 inch pieces. This will make getting them into the jars much easier. Rinse and fill cook pot with water add seasonings  , cut bacon in to 1 inch pieces and add to the beans. Heat to boiling and reduce heat to simmer for about an hour. While the beans are cooking clean your jars , lids and boil them for ten minutes. Turn off burner and let your jars / lids sit in the water until you are ready to fill them. Once finished with your jars go ahead and get your Pressure Canner ready , follow your canners instructions. Typically pints will process for 75 mins. and quarts 90 mins. This recipe is NOT for Steam Canners. And Please be sure to Follow your Pressure Canners Instructions. Fill Jars with 1 inch head space add green beans first and then your liquid , make sure to use a plastic spoon and move them around in the jar a little to get any air bubbles out. Proceed to process and remember to time properly. Last but not least Have Fun and enjoy the fact you are living simpler and healthier :)

Wednesday, July 13, 2011

My Journey


This blog is for all those like me who are looking for some simpler ways to live our lives. It's not to say that many things won't take a little more time , you see a simpler life doesn't mean taking the easy way out. It means doing for ourselves , a healthier way of doing things that will in fact make life easier in the end.
I have always been a crafty person it just seems to come naturally to me. Since I was about 8 yrs. old I have been making and doing. I grew up on my Aunt , Uncle and Grandfather's farms so there were always things to be done. From planting , harvesting and preserving. All of which sound like a great deal of work and when I was little that is exactly what it was to me WORK! But now that I am older and remembering my life I realize that the things I did then and the things they taught me were more precious then gold. With all the time we spend on computers we are losing time in our lives and the lives of our families. Many people would say they spend anywhere from 2-4 hours a day playing on computers. Notice I said playing , not working. I wanted to get more crafting done and realized I was spending way to much time playing on my computer. That was what was eating away my time and in my opinion my life. I also wanted to feed my family healthier foods , less processed foods so I bought a canner and an ice cream maker. And once again it popped in my head about my computer friends and games. I could not believe how addicted I had become and vowed to make changes. You see in making and doing for myself not only can I save money , feed my family better , be less stressed and be self sufficient , I can spend more time WITH my family and spend my time LIVING my life instead of wasting it and wondering where it all went.
I sew , make candles , soaps , jewelry and now I am canning our own vegetables  , jams and anything else I can make from scratch to insure I know what is in it. We will also be making our own ice cream , candy and the likes. You see I truly believe this is healthier at least it was when I was growing up. In working to achieve we feel more satisfied and less stressed how can anyone lose? We also should be including our family , the little ones actually find it fun and exciting to make and do for themselves. To know they can make what ever they need and in fact don't need all the technology that is being fed to us on a daily basis.
I will be posting tips tricks and pit falls I face in this journey back to simply living and how the challenges of today's society affect this process. Today we are canning green beans , I have not done this in yrs. so it will be interesting to see how things go.
Until my next post , enjoy your life and your family.